How tree testing works
In this chapter, we'll walk through the steps involved in building a tree test. By the time you're finished reading this guide, you'll have all the information you need to start tree testing right away!
Tree testing guide
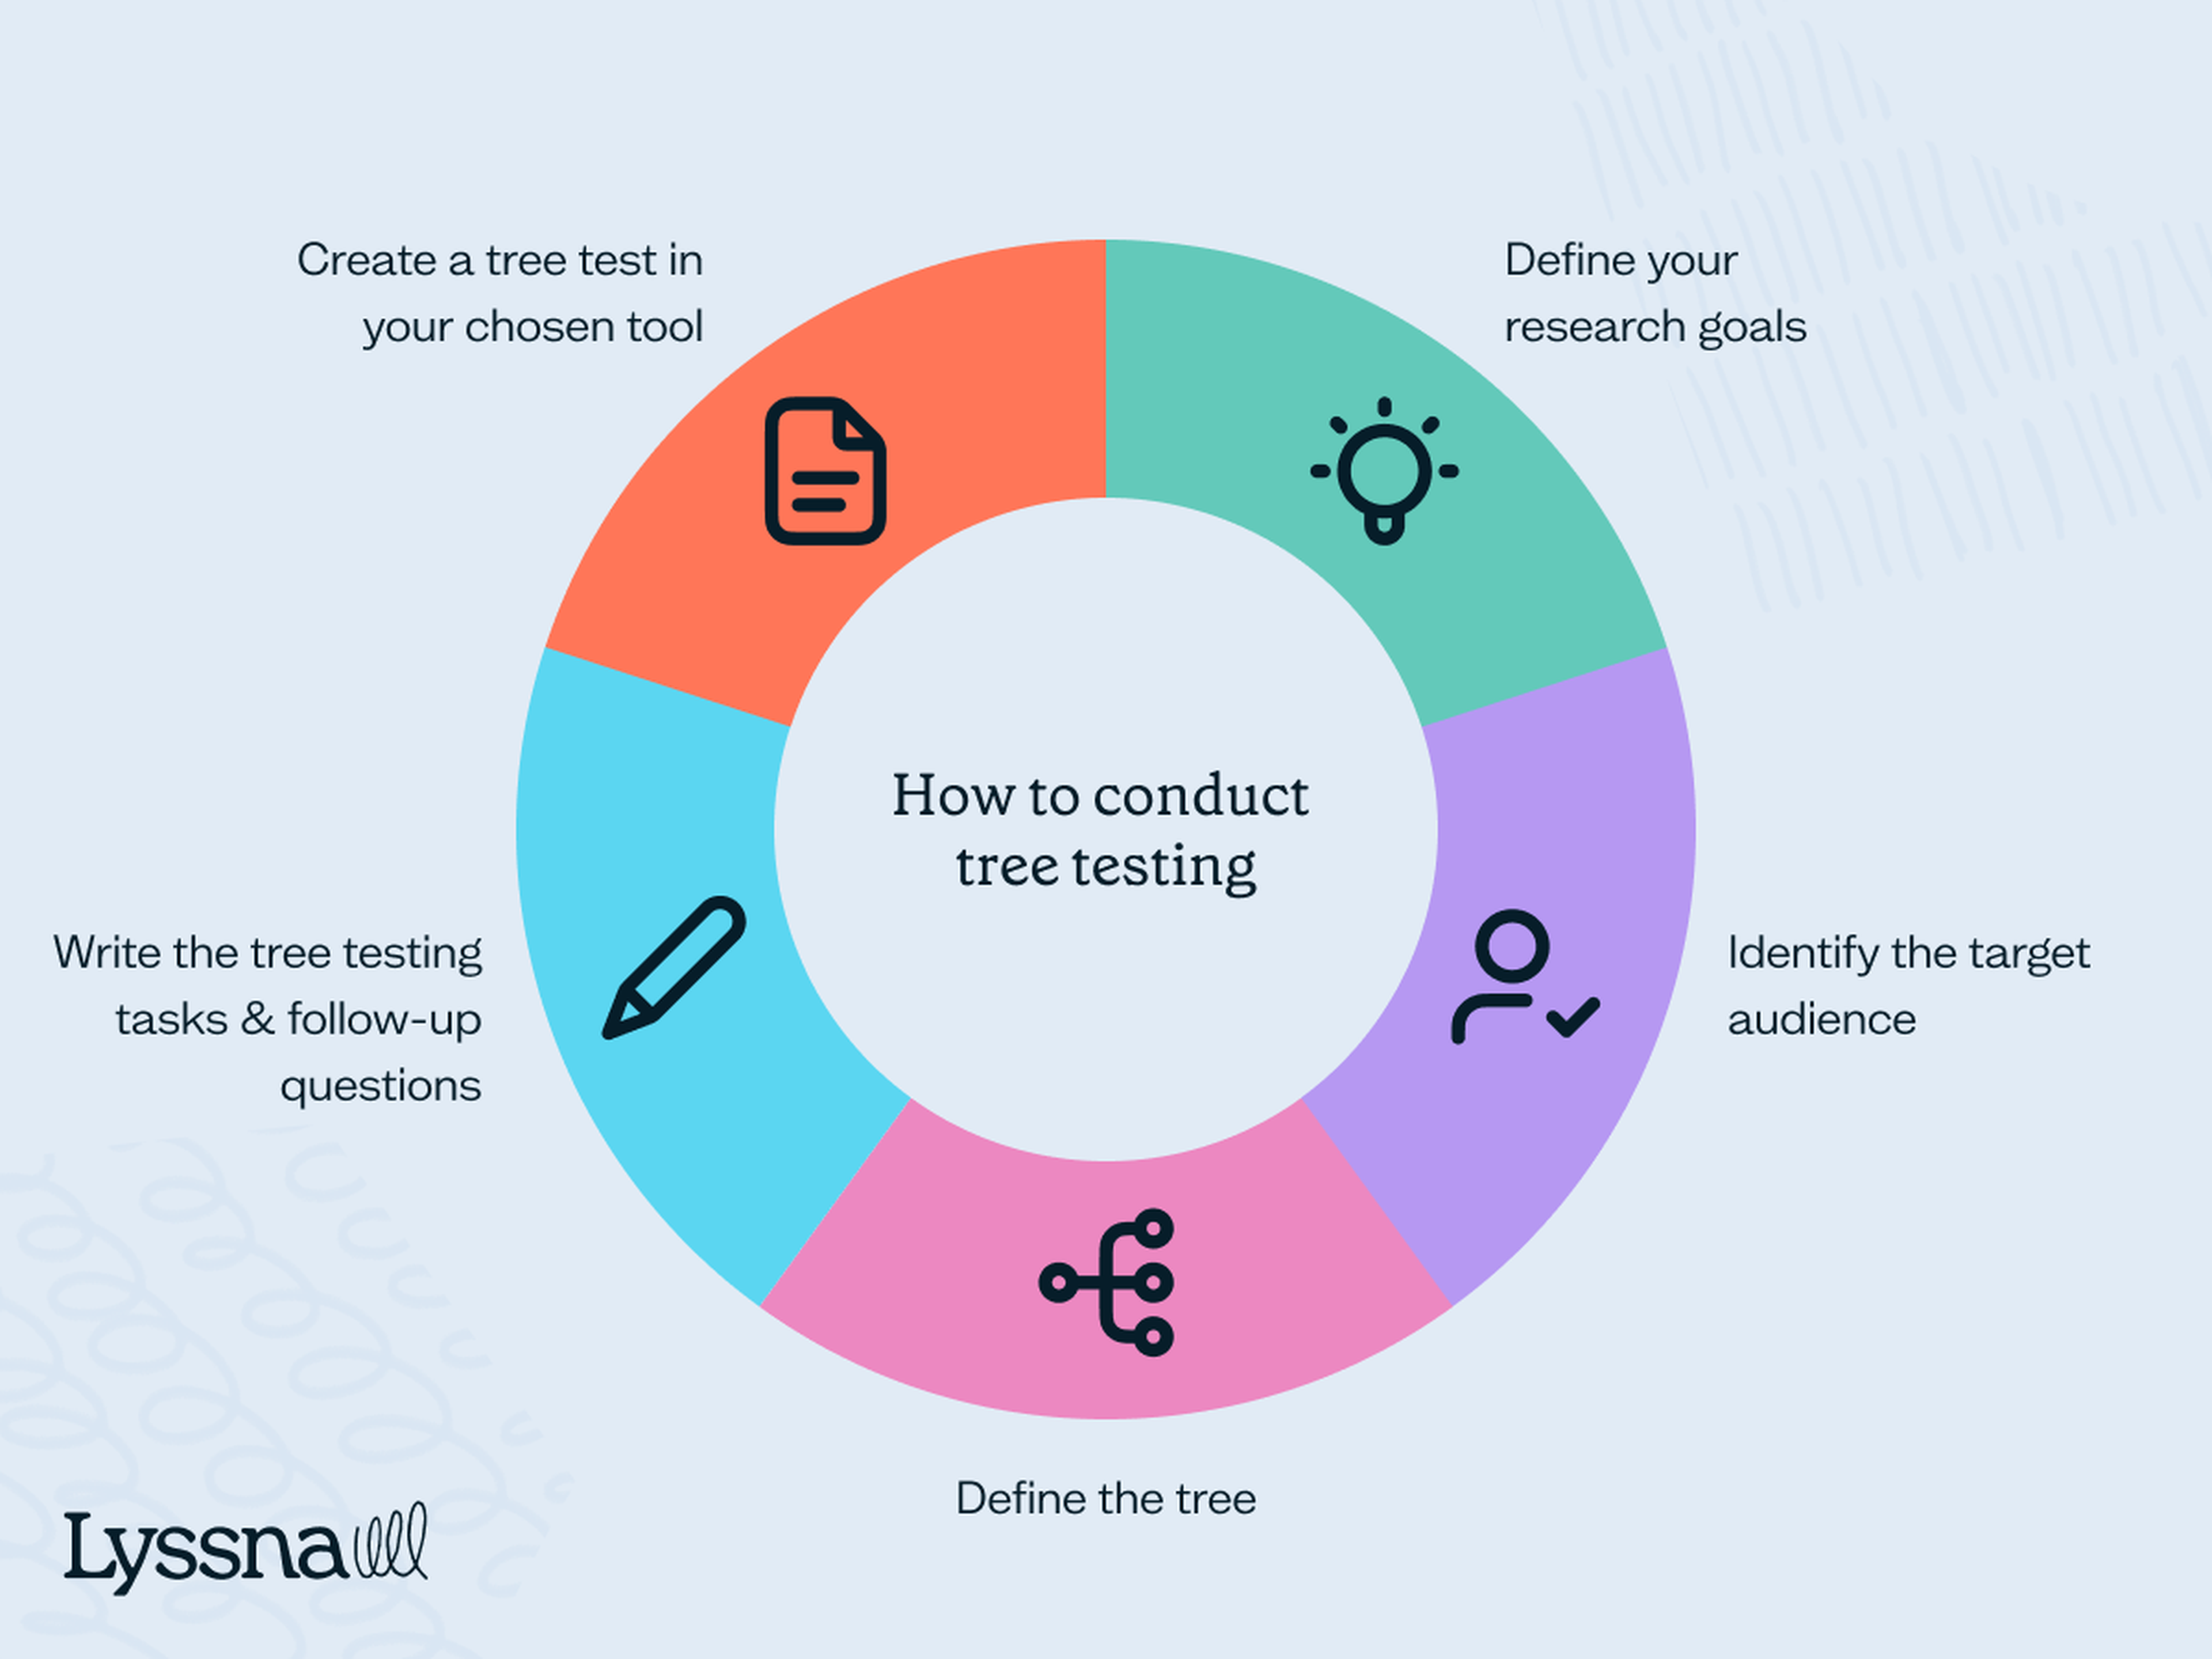
Step 1: Define goals for your research
Before conducting a test of any kind (not just tree testing), you need to define what your goals are. Otherwise, what are you measuring against?
For tree testing, one obvious goal would be to "validate site hierarchy based on categories defined through card sorting."
However, if your product is going through a site migration as opposed to developing a wholly new product, a better goal might be to "test if the existing site hierarchy is still optimal for users" or to "test new predefined categories," where the latter may be necessary if lots of new content has been added.
Defining your goals in this way helps shape the tasks and metrics for the test.

Step 2: Identify the target audience
Once you've defined your research goals, you'll have a better understanding of the audience to recruit for your test.
For example, suppose you're testing in the early design stages. In that case, you'll want to recruit participants who fit the marketing team's Ideal Customer Profile (ICP) to see how potential users navigate the product hierarchy.
If it’s a site redesign or migration, existing users can provide valuable insights based on their prior experience with the product.
Learn effective strategies for recruiting user research participants, including understanding your target audience, recruiting customers and non-customers, and offering incentives.
How many participants do you need for tree testing?
The number of participants you need for tree testing will depend on a few factors, such as the design stage you’re at, the complexity of the tasks, and the time and budget you have available.
However, when aiming for statistical significance and reliable numerical metrics, we recommend aiming to recruit around 40 to 60 participants, with 30 as a minimum.
Step 3: Define the tree
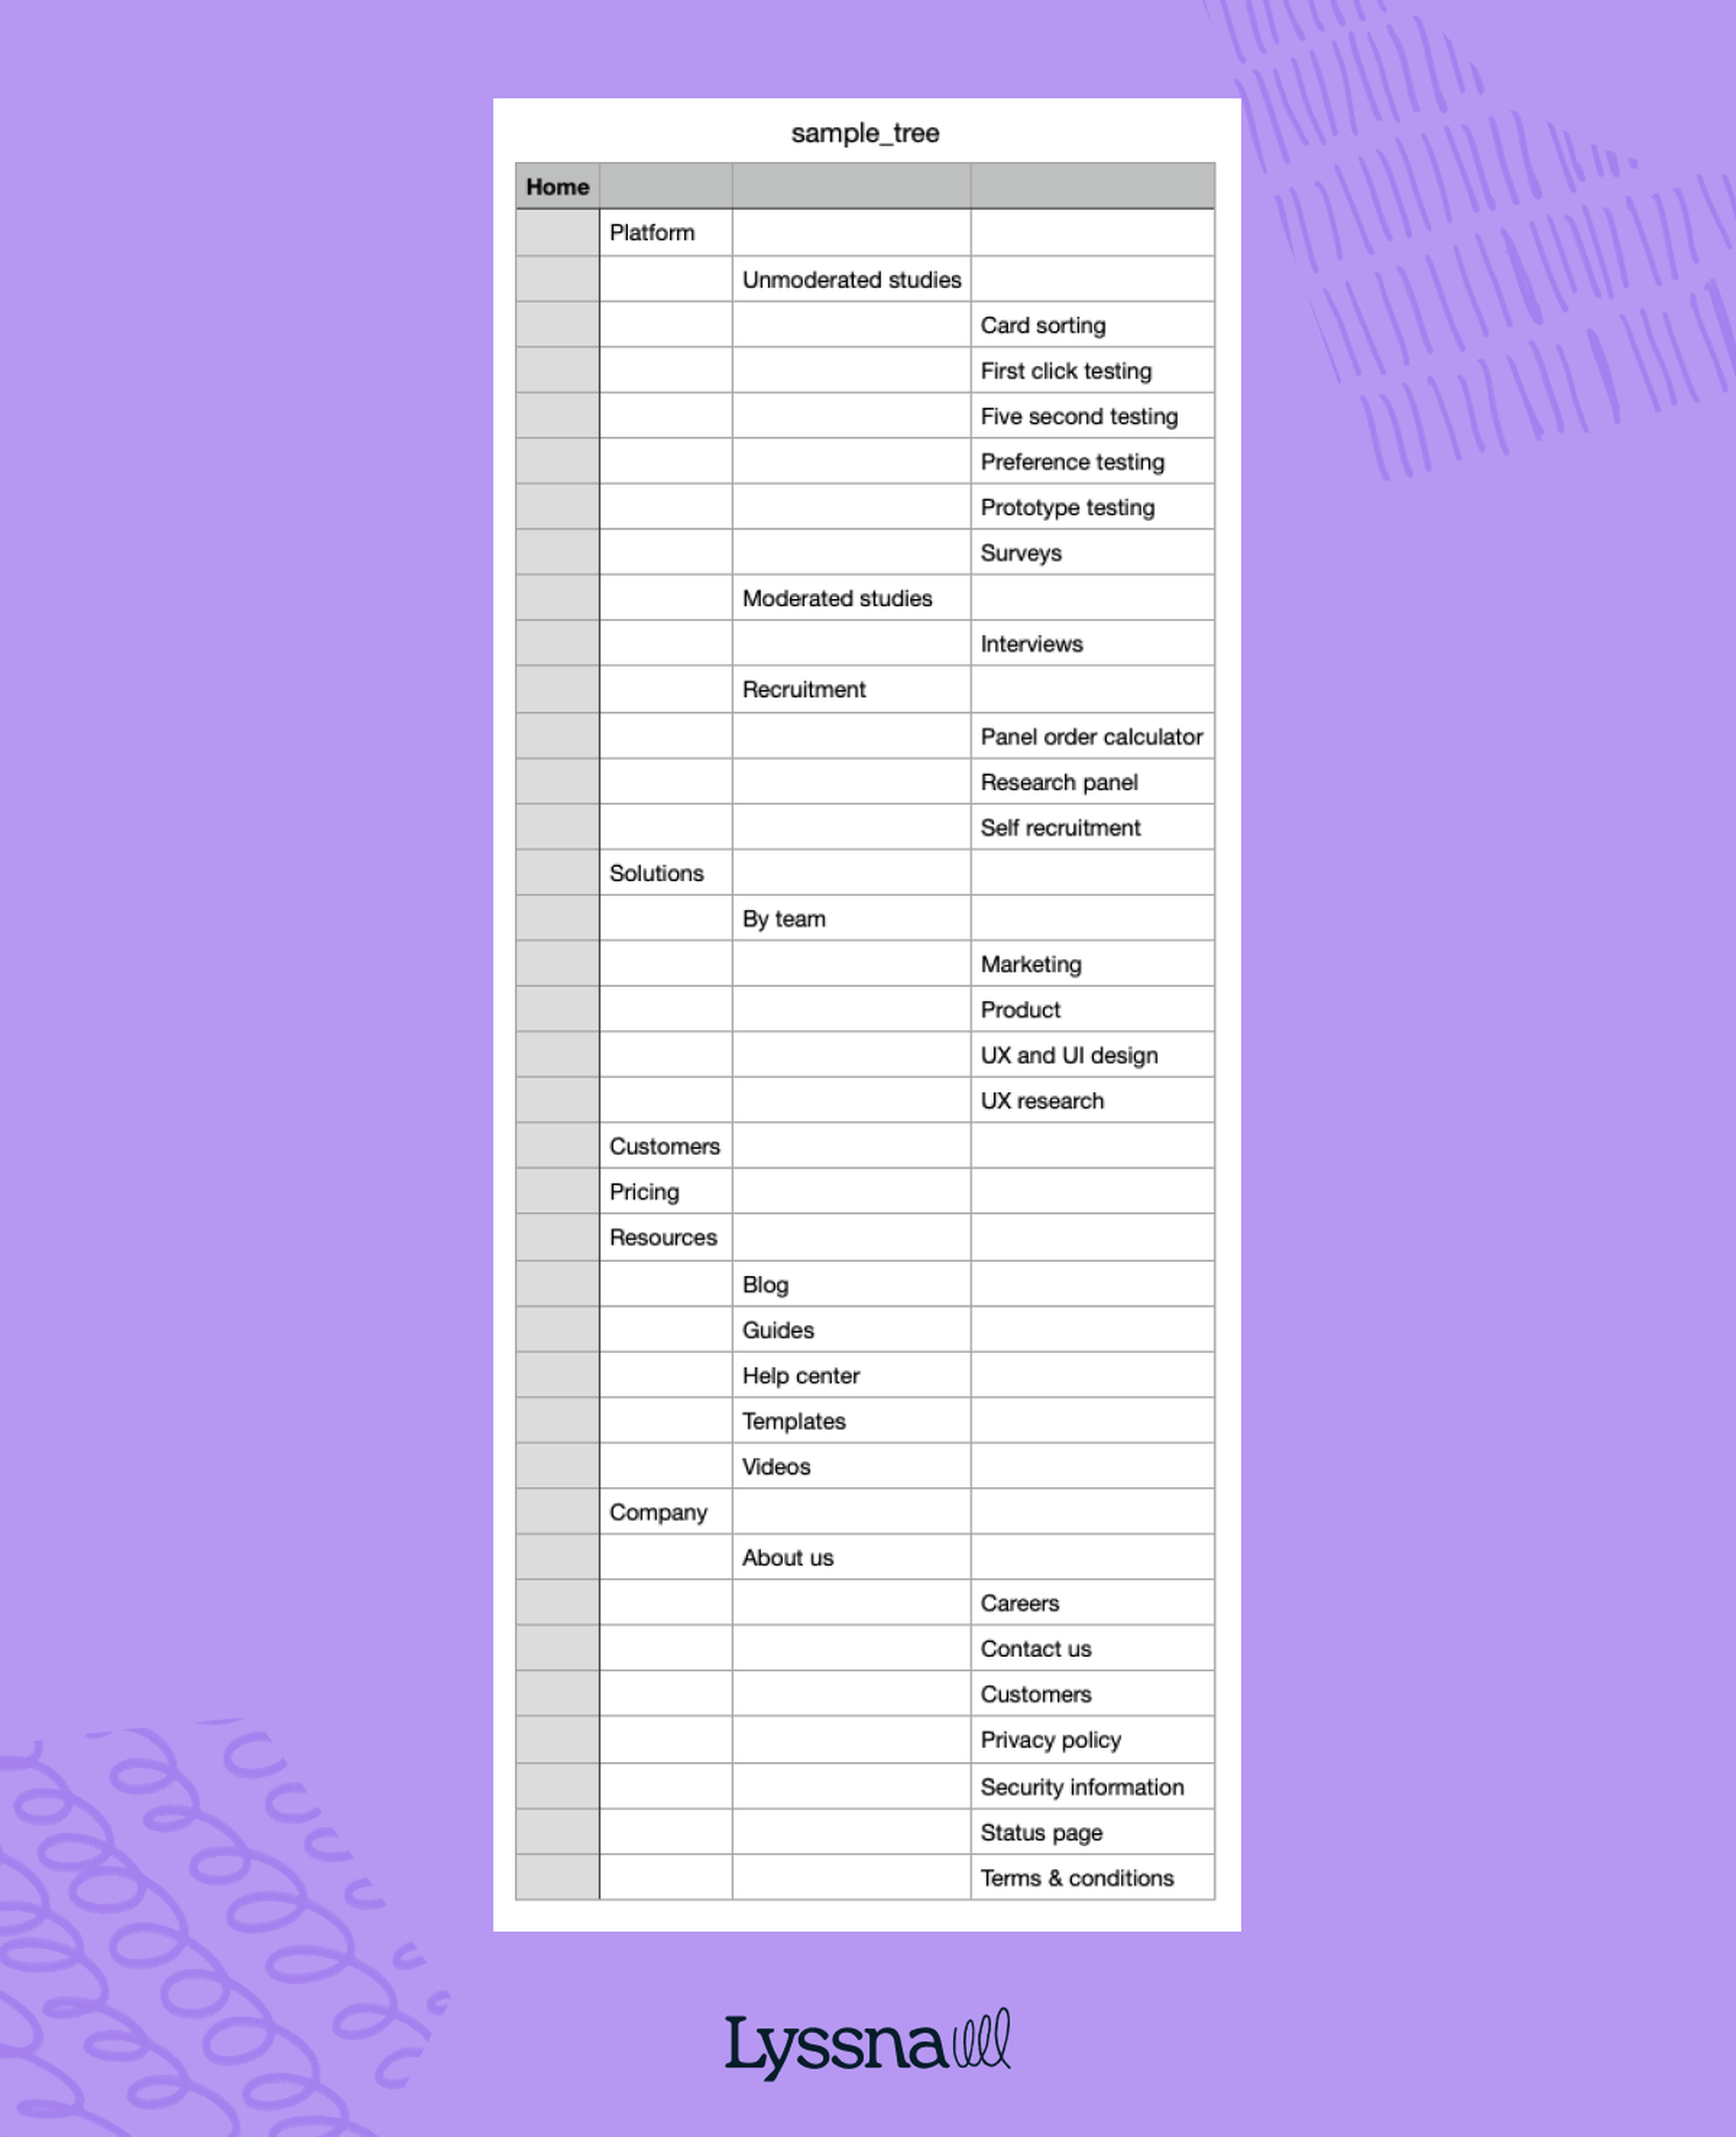
After determining your goals and target audience, you can define the tree structure for your test. If you’re using an existing site structure, this step is relatively straightforward as you can replicate the information.
However, if you’re testing a new product, you can design the tree structure based on the results of a card sort. Use the categories that users find most intuitive as categories in your tree and design paths accordingly.
In Lyssna, you can add parent and child nodes manually or import a tree as a CSV file. You can also download our sample tree CSV file and use it as a template.
Step 4: Write the tree testing tasks

Once you've created a tree, you can write the tasks for your participants. This will largely depend on your goals. For example, if you’re designing a travel booking site and are in the early development stages, you could run a tree test to validate and refine the proposed information architecture.
It’s important to develop tasks that can fully engage users in realistic situations they may come across on your website. Use simple, informal language to set the scene and prompt them to find a solution. This approach helps engage participants and encourages them to process information more deeply, leading to meaningful insights.
For example, instead of writing:
"Select where you’d go to book a European flight.”
You could write:
"You're dreaming of a vacation in Europe but haven't decided on a destination yet. Where would you go to explore flight options for your European adventure?"
Here are some other best practices to follow when writing tree testing tasks:
Use natural language: Write tasks in conversational, plain English to mimic real user scenarios and encourage participants to engage naturally with the test.
Keep tasks clear and concise: Make sure tasks are easy to understand and focused on a specific goal within the tree structure. Avoid ambiguity or complex instructions.
Provide context: Introduce a realistic scenario or context that participants can relate to, helping them understand the purpose of the task and how it applies to their needs.
Avoid leading language: Don’t guide participants toward specific paths or solutions in the task's wording. For example, using our travel site example, you wouldn’t say, “You're planning a weekend getaway to Paris and you need to book a hotel. Please click on the ‘Accommodation’ tab to find available hotels in the city center,” as this guides them to the correct answer. (We explore how to avoid bias in the Common tree testing challenges chapter).
Include varied tasks: Incorporate different types of tasks, such as finding specific items, exploring categories, or performing actions to assess various aspects of the tree structure's usability.

How many tasks should you include in a tree test?
The number of tasks you give your participants can vary depending on the complexity of your navigation structure and the depth of insights you're seeking.
As a general guideline, though, we recommend including no more than 10 tasks in a tree test. This allows your participants to engage with different aspects of the navigation and provides enough data for analysis without overwhelming them. It also avoids participants becoming too familiar with the tree structure during the test, which can bias the results for later tasks.
If your navigation structure is particularly complex, you may consider having fewer tasks to make sure participants can focus on each one effectively.
In Lyssna, we don’t limit the number of tree test tasks you can include in a test. To create additional tasks, simply duplicate the section and select a new correct answer for each task.
Step 5: Write your follow-up questions
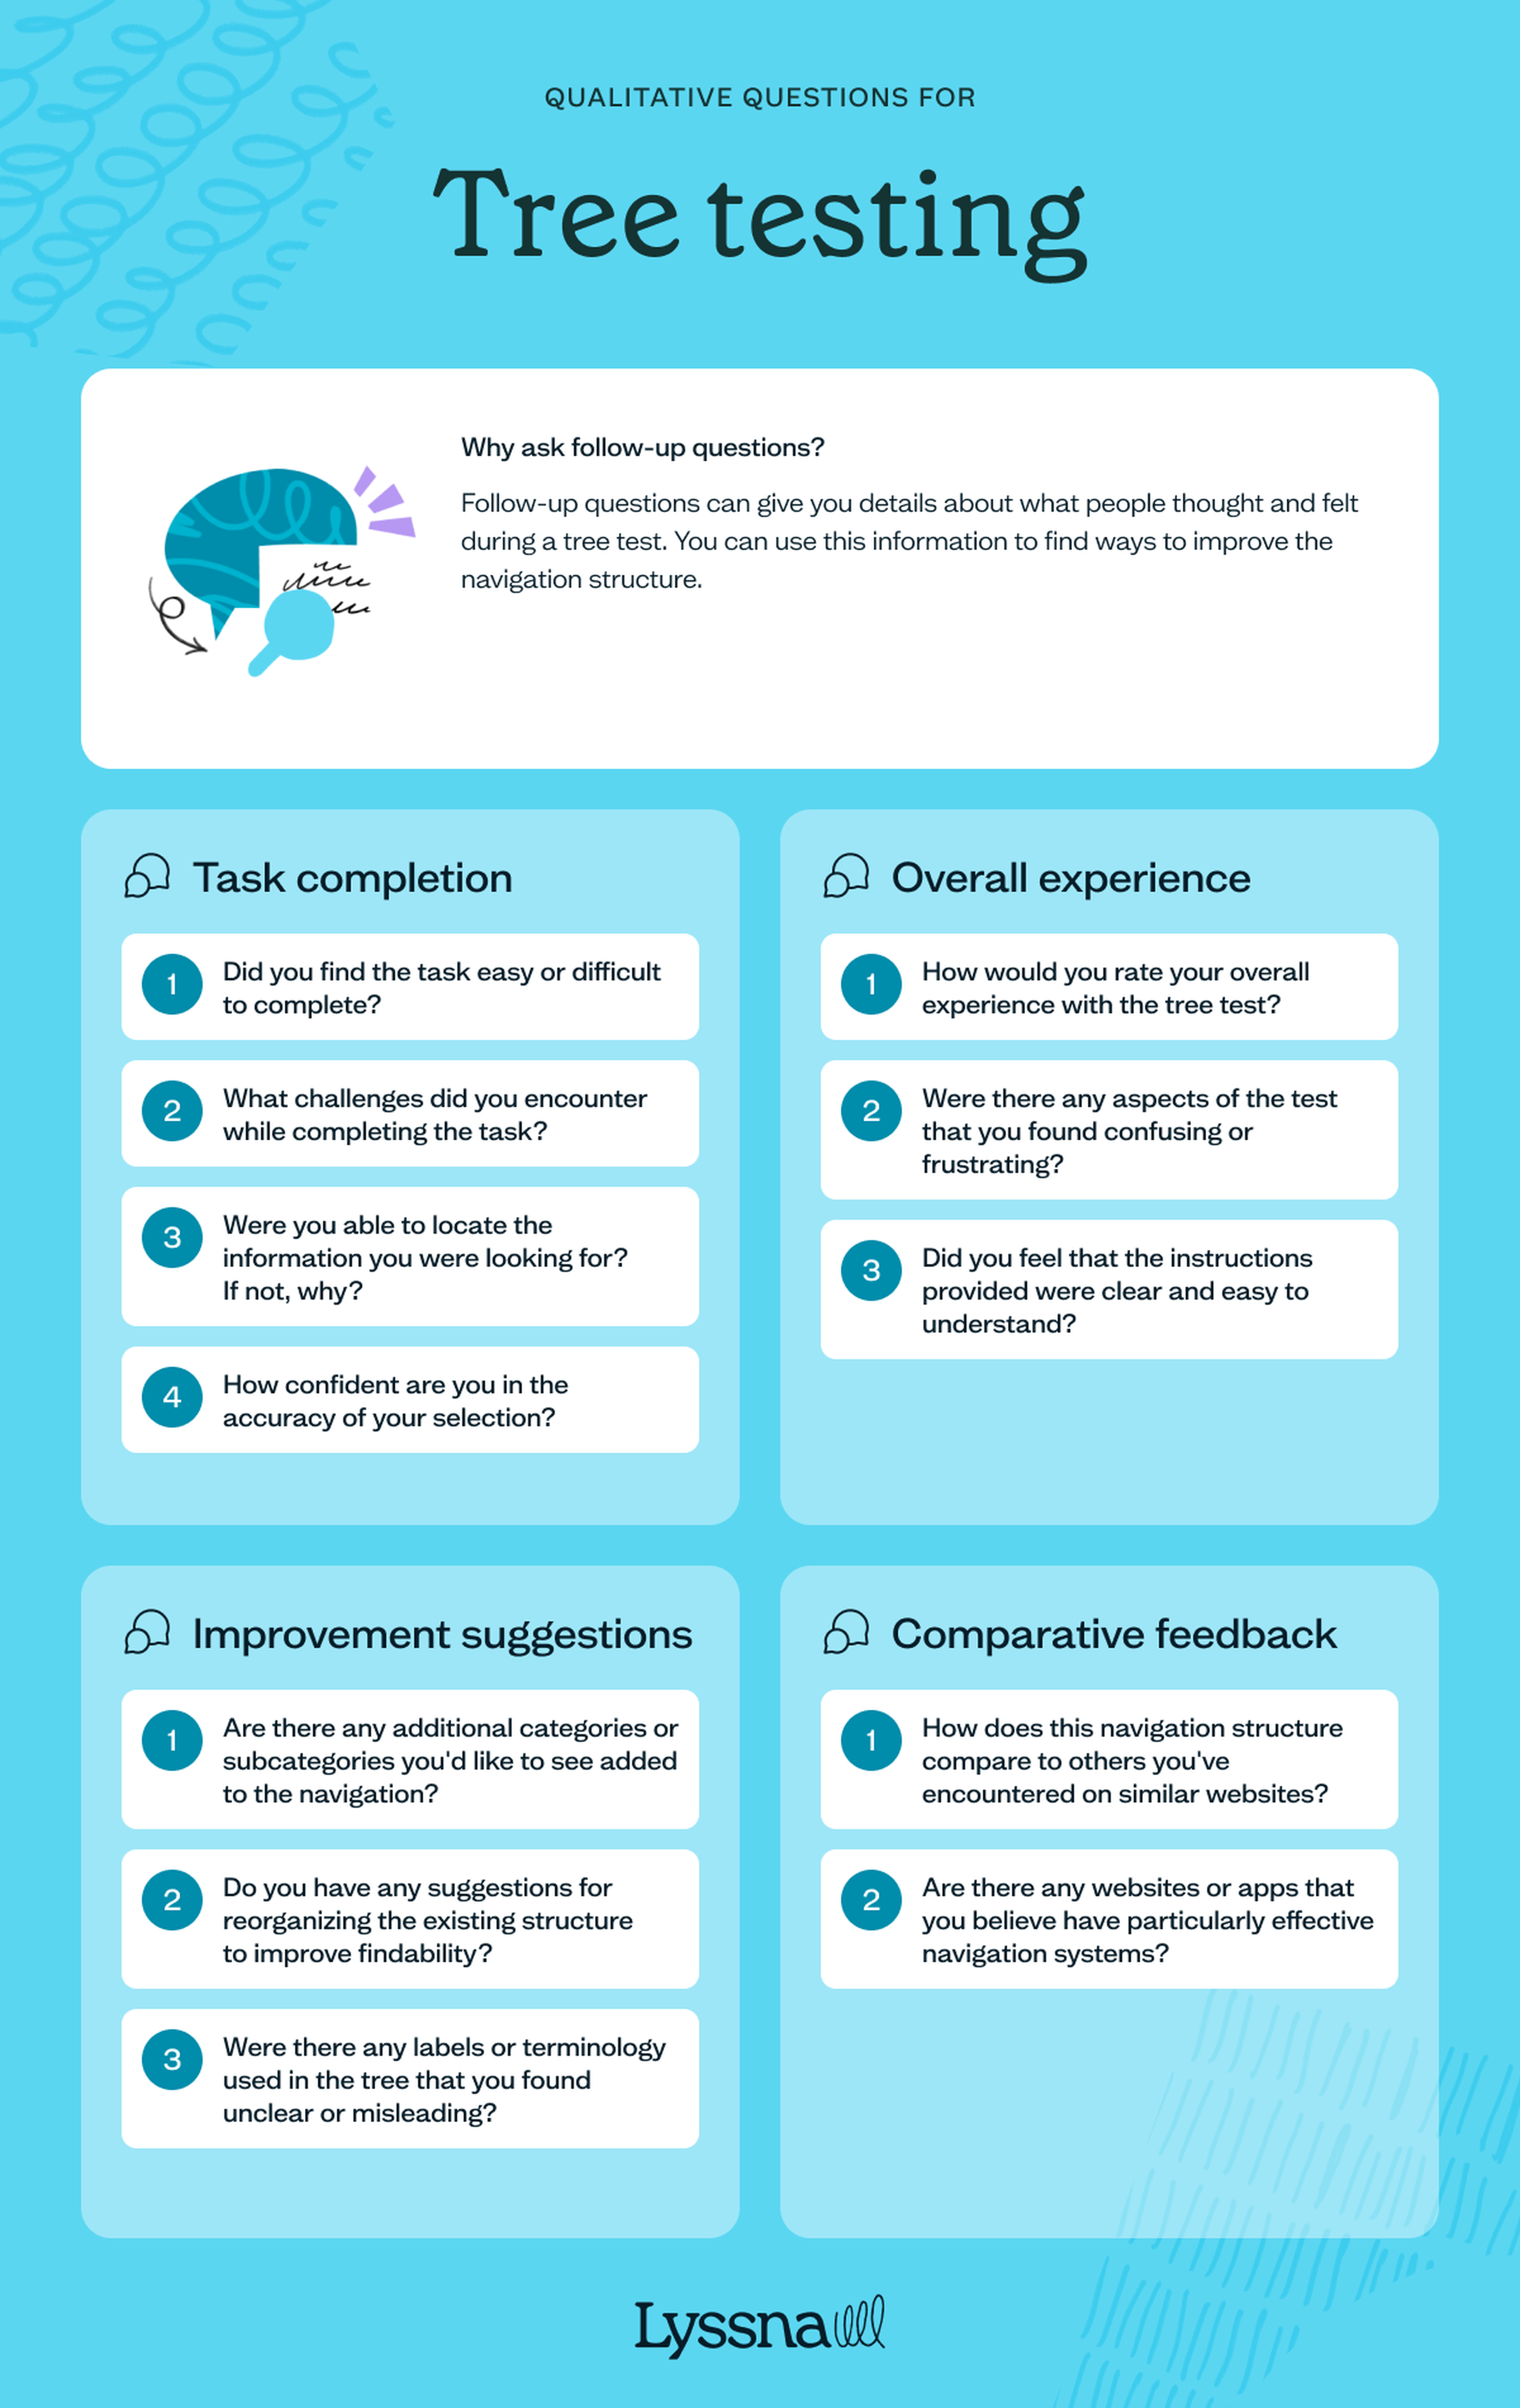
Follow-up questions can provide valuable qualitative insights into participants' experiences and perceptions of the tree test, helping to identify areas for improvement and refinement in the navigation structure.
Here are some example follow-up questions to ask after conducting a tree test.
Task difficulty
A linear scale question to gauge the perceived difficulty of tasks can provide quantitative data to complement qualitative feedback. Here's an example: "On a scale of 1 to 5, where 1 is very easy and 5 is very difficult, how would you rate the difficulty of completing the task?".
Task completion feedback
Did you find the task easy or difficult to complete?
What challenges did you encounter while completing the task?
Were you able to locate the information you were looking for? If not, why?
How confident are you in the accuracy of your selection?
Overall experience
How would you rate your overall experience with the tree test?
Were there any aspects of the test that you found confusing or frustrating?
Did you feel that the instructions provided were clear and easy to understand?
Suggestions for improvement
Are there any additional categories or subcategories you'd like to see added to the navigation?
Do you have any suggestions for reorganizing the existing structure to improve findability?
Were there any labels or terminology used in the tree that you found unclear or misleading?
Comparative feedback
How does this navigation structure compare to others you've encountered on similar websites?
Are there any websites or apps that you believe have particularly effective navigation systems?
Step 6: Conduct your tree test
The final step is to create the test itself. You can use a platform like Lyssna to create and facilitate your test – we have a ready-made tree testing template you can adapt to get started quickly, and the below video shows you how to set up your test in a few simple steps.
Once you've distributed the test and received the responses, you can move on to analyzing the results. We’ll get to that in the next chapter.